Week 22 - Progress so far
The current status of my hive build is as follows:
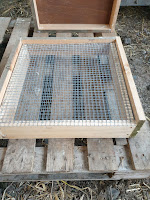 This is the floor of the hive, it is obviously located at the bottom and it holds the weight of all the different sections of the hive. This is also where the hive entrance is, which controls how many bees can leave and enter; the hive tray is at the back which catches any unwanted materials like pieces of comb or unwanted pollen. It can also block any cold air from entering during the winter to keep the hive warmer for longer and make it easier for the bees to regulate the heat of the hive. It is almost complete now, apart from the hive entrance that I still need to finish off.


This is the super box, this is where the bees will store the honey for use during the winter or it is where the beekeeper will collect the honey from the bees - without the worry of baby bees being amongst it. It is complete, there is nothing else to add to the super box and it is ready to be used in a hive.

This is the crown board (basically the lid of the hive) and separates the super box from the roof. It also acts as a feeder station for the bees, this is because ambrosia fondant can sit over the hole, in the middle of the crown board, providing access for the bees to feed during the colder months of hibernation. There is nothing else to add to the crown board - except that I need to find something to cover the hole for the rest of the year when the bees aren't being fed.

This is the brood box and is where the queen bee and all the worker bees are born, work and live. It is where the queen bee lays the eggs in all the frames that are held within the brood box. This brood box sits on top of the floor of the hive and is below the super box. It is complete and there is nothing else I need to improve on it and it is ready to be used in a hive.
This is the roof of the hive, it helps to protect the hive form all the weather that is thrown at it throughout the year - it also protects the hive from objects falling on the hive and potentially damaging it, such as branches for example. The only thing I need to add to the roof is maybe some additional insulation, to help the bees keep warmer in the Winter. This could be either wool or woodchips or sawdust that I will add (about two inches of it) and I will cover it up with a thin board so it doesn't spill every where.
Once all of these extra things are done and all the different parts of the hive are complete, then I will try and add some bees to my hive and see if they will live and survive in there. If they survive and thrive; then this shows how good my hive is and will prove how good my skills of making a hive are.


Comments
Post a Comment