Week 3 - Different ways to cut Wood

In most cases, a cross-cut determines the length of the piece of wood. For example, if I have a piece of wood that is 12 inches long and I want it 8 inches long, I would make a cross-cut to shorten it to the desired length. The blade is positioned straight up and down at 0 degrees and is square to the board being cut.


Rip-Cut
A rip cut, is a cut parallel or with the grain of the wood.
Generally but not in all cases a rip cut determines the width of a piece of wood. For example, if I have a 1 x 4 piece of wood that I want to trim to a 1 x 3 size I would rip cut one inch off to decrease the width.

A miter cut is a cut across the grain on the face of wood that is cut at a degree other than 90 degrees.
Two 45 degree miter cuts of wood, will be used to create a joint of 90 degrees. Examples of 45-degree miter cuts are seen in the corners of a picture frame or the top corners of a door moulding.


A bevel cut can be cut across or with the grain of the wood. A bevel is an angle other than 90 degrees, that is cut along the thickness of the board.
A bevel cut changes the angle of the board’s edge. Bevel cuts soften the edges of a piece and function for safety reasons. Some examples of bevel cuts occur with baseboards, moulding, and creating geometric shapes.

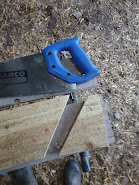
As you can see, I also had a go at performing this style of cutting. I believe that this was not as successful as the other cuts. This was because the cut was a lot more challenging than what I first thought it would be and so I struggled when I was cutting.
However, I think that this style of cutting will also be useful because again it will provide greater strength on corners and it will be more useful when building the hive.
The Four Most Common Ways to Cut Wood - Dream Design DIY
How this helped me?
This website has opened my eyes to many other ways of cutting wood, the benefits and drawbacks of them also. With this information and practice of performing these cuts, I am now more confident with skills and growing knowledge of how to build a beehive. I am sure that these different styles of cutting will greatly benefit me. When I do start to build my beehive, I now know that different cuts can be utilised in different ways and so bring added strength and a good finish for both the design/finish and practicalities of an operational beehive.
Also practicing these ways of cutting wood has increased and further improved my knowledge of cutting wood, which was quite limited up to now. I have realised that using good techniques and applying these skills will benefit me further down the line by having a solid construction which will withstand heavy use and so not breakdown, split or come apart when the bees are at their most active. This would result in them swarming in an attempt to find a new home, which could be in my neighbours garden tree!


Comments
Post a Comment